Skip-Bombing the Aoba

In early April 1943, the 43rd Bomb Group was repeatedly sent on missions to keep an eye on the Japanese base 150 miles northwest of Rabaul at Kavieng, New Ireland. On April 2nd, no shipping activity was observed, but Australian Coastwatchers reported seeing somewhere between 10 and 12 ships around the harbor area. Just in case the Japanese were planning a convoy mission, eight B-17s from the 64th Squadron were loaded up and sent out to disrupt those plans in the wee hours of April 3rd.

To keep Japanese from locating the B-17s easily, pilots flew with blacked out instrument panels. Their only source of light was provided by the stars. “In this way our night vision became very acute,” wrote pilot Arthur T. Curren. “In fact on long night missions we flew the B-17 by fixing reference stars in the corners of the windshields and flew by the seat of pants, not artificial horizons, etc. I can’t really explain to you or understand myself at this late date [50 years later] the visual cues and sightings I used to fly this mission.”

April 5th diagram
Note the date on this diagram. For this post, it is used as an example of the bombing runs made by B-17 pilots. After the 64th claimed hits on multiple warships near Kavieng on April 3rd, the 63rd was no doubt eager for their own chance on the target the next day. This diagram plots the bombing runs flown by the 63rd Squadron and the reported size and position of their targets. (Hoover Cott Collection)

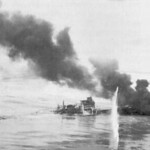
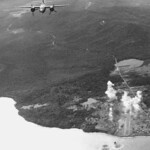
Arriving over Kavieng and its harbor, each formation’s flight leader stayed near the base to drop an occasional bomb, another B-17 stayed high above the action to drop flares illuminating the anchorage and the rest of the B-17 crews hunted for ships to skip-bomb in the harbor. When the Japanese heard the planes, they sent up tracer rounds in attempt to locate them. Gunfire of all sorts flew around the harbor as the Japanese refused to turn on their searchlights and give away the positions of their ships. At one point, Curren noticed a flare burning beyond his right wing, likely on the deck of the heavy cruiser Aoba.

Lieuteanant Curren began his skip-bombing approach and was greeted by heavy antiaircraft fire. “Suddenly, I realized that we were headed directly into the side of a Japanese cruiser, just aft of the pagoda [the tall tripod structure amidships] and below the height of the bridge and forward structure.” He held his course and altitude until the bombardier confirmed that the last bomb had dropped, then “I jerked back on the controls and we cleared the ship. None of the crew, including co-pilot Roger Kettlleson, have any idea of how close we came to tripping over the steel superstructure. The navigator later reported he thought we would hit the water when his altimeter read 50 feet below sea level on the bomb run.”

B-17 night skip-bombing diagram
An illustration of the basic concept of skip-bombing. Note that unlike small and medium bombers, the four-engine B-17 could not pull away from the ship immediately after dropping its bombs. This is why the 43rd Bomb Group only skip-bombed at night: passing over an enemy ship at that altitude during the day would have been extremely dangerous. (Unknown Collection)

Curren’s tail gunner reported that three bombs exploded and the crew felt two shockwaves and witnessed bright explosions from the cruiser. After that run, it was time to head for home. While the flight back was uneventful, Curren’s landing nearly turned precarious when he realized that the landing gear had not lowered. He pulled up, flew around, then landed with the gear down. Later, it was reported that one of the bombs from Curren’s plane scored a direct hit on the Aoba and the other two explosions were actually from two of the ship’s torpedoes subsequently exploding. The Aoba was towed to Truk, where it underwent initial repairs for three months, then was moved to Kure, Japan for six months’ worth of more extensive repair work.

Using a B-17 for night skip-bombing missions was no easy task. This post summarizes the vivid description written by Lt. Curren and printed in Ken’s Men Against the Empire, Volume I. We highly recommend our readers pick up a copy of the book for his full story.

Art from the Archives

This illustration was originally commissioned from aviation artist Jack Fellows for a smaller book that would have focused specifically on the Battle of the Bismarck Sea. Unfortunately, we did not have the manpower to pursue this project, and the color section of Ken’s Men Against the Empire, Volume 1, where it would have fit thematically, did not have any spare room for a fourth painting.

Art from the Archives

The scene depicts the final day of the Battle of the Bismarck Sea on March 4th. By that time, only two crippled ships remained in the area after the remaining four destroyers had been withdrawn. Hundreds of Japanese soldiers and sailors from the sunken and disabled ships were in the water awaiting rescue and struggling for survival.

Fifth Air Force commanders believed that the Japanese soldiers in lifeboats, barges and rafts still represented a threat should they be brought to Lae and verbal orders were given to strafe any vessels containing Japanese servicemen. Many of the American and Australian airmen were reluctant to carry out these orders, though they had all heard stories of war crimes committed by the Japanese during the past 16 months of war. Still, these ordered attacks were carried out, albeit with a lack of enthusiasm.

The collective attitude of the 43rd Bomb Group B-17 crews was very different. One day earlier, the 63rd Squadron B-17 KA-PUHIO-WELA, piloted by 1/Lt. Woodrow W. Moore, was shot down by Japanese fighters. As members of Moore’s crew bailed out, they were fired upon in their parachutes by the Japanese Naval pilots.

The story of this atrocity spread like wildfire through the 43rd, then the rest of the Fifth Air Force combat crews. To the 43rd’s airmen, this order was an opportunity to take retribution for their friends in Moore’s crew. Thus the cycle of violence and death in war was perpetuated.

Here, 1/Lt. James C. Dieffenderfer, piloting the 63rd Bomb Squadron B-17 FIGHTIN’ SWEDE, sweeps low over the water, with wing dipped to allow the left waist and turret gunner a clear shot. In the foreground, a Daihatsu barge that had been rescuing survivors zips out of the line of fire. They would have been targeted next. In the background a Japanese ship is burning.

Profile History: Gypsy Rose

This aircraft was assigned to the 19th Bomb Group and was flying with the 435th Reconnaissance Squadron by the second week of July 1942. Transferred to the 403rd Bomb Squadron, 43rd Bomb Group on November 9, 1943, its first two flights with the 403rd were courier missions piloted by 1/Lt. Robert B. Irwin. It is unknown to what extent this aircraft was flown in combat by the 403rd. The bomber was transferred to the 65th Squadron in mid-January, after the 403rd relinquished their B-17s at the time of their move to Mareeba, Australia.


The bomber was flown regularly on combat missions by the 65th, including the follow-up raid the day after the big attack against Rabaul on February 14th, the largest raid the 43rd had conducted against the Japanese bastion up to that time. The B-17 received two holes in its vertical stabilizer. This aircraft also participated in the Battle of the Bismarck Sea when it was flown by Arthur A. Fletcher, Jr., who was a regular pilot of the aircraft. On March 2nd, Fletcher missed his target entirely, but on the afternoon of the 3rd, he watched his bombs score a near miss on the destroyer Asashio, which he claimed was responsible for immobilizing the ship.

The last combat mission for the bomber was a night raid against Rabaul on May 24, 1943. The plane was running low on fuel during the return flight, forcing the pilot, 1/Lt. Raymond S. Dau, to ditch it in the sea off Buna. No one was hurt in the water landing and everyone made it into the life rafts, from where they were picked up by a boat from the 41st Infantry Division the next day.

B-17 Gypsy Rose
B-17E #41-9193, GYPSY ROSE, was initially transferred to the 403rd Squadron as a transport plane after serving in the 19th Bomb Group but before it went to the 65th. While in the 65th Squadron, it acquired its nickname and nose art, a reference to Gypsy Rose Lee, a contemporary striptease performer. GYPSY ROSE was lost on May 24, 1943, when it ran out of fuel returning from Rabaul and was ditched near Buna. All of the crewmembers survived unhurt. (Charles Stenglein Collection)


The name of this aircraft, GYPSY ROSE, is a reference to Gypsy Rose Lee, a famous burlesque dancer, actor and author of the era. The nose art depicts her performing her famous striptease act. The name, written in red and outlined in orange, is reminiscent of brightly lit neon signs outside of theaters and clubs. The cursive script used in the lettering of the name is of the style seen on many early 65th Squadron aircraft, indicating #193 acquired its nickname while in the 65th. Also partially visible in our profile painting are the block letters U.S. ARMY painted on the underside of the wings. This identifier had been removed from the USAAF markings specifications before the 43rd began flying combat, but the bomber came out of the factory paint shop so marked, and this was never painted over.

The known combat missions this aircraft flew, all in 1943, were: Rabaul, 2/15 (Fletcher); Rabaul, 2/23 (Crawford); Battle of the Bismarck Sea, 3/3 (Fletcher); Rabaul, 3/23; and Rabaul, 5/24 (Dau).

Read more about the 43rd Bomb Group and see the color profile for this B-17 in Ken’s Men Against the Empire, Volume I.

IHRA’s Top 7 Posts of 2020

This week, we’re listing our most popular posts published this year as determined by the number of views. Did your favorite post make the list?

Thank you for your continued support by subscribing, reading and sharing our work, and buying our books. If there’s anything you’d like to see more of, let us know in the comments. We’ll be back next year with more great content. And now, without further ado, our most popular posts published in 2020.


Tanker at Tourane 1. Adrift at Sea: A Chance Encounter A downed aircrew from the 345th Bomb Group waits for rescue.


Color illustration in the book Rampage of the Roarin' 20's2. Alcohol Busters Highlighting one of the paintings by aviation artist Jack Fellows that appears in our book Rampage of the Roarin’ 20’s.


Feeding a kangaroo3. A Collection of Photos Here, we shared some of the photos that don’t make it in our books.


4. Ditch at Sea and Live in a Boeing B-17 Learn all about the procedures taken to prepare for and ditch a B-17.

B-26 Over Lae5. Takeoff Snafu A 22nd Bomb Group mission started off on the wrong wing…


Fisher with Topsy6. Roland Fisher’s Brush with Death This member of the 43rd Bomb Group had two close calls with Japanese aircraft. Here is one of the stories.


B-17 Pluto II 7. Loss of PLUTO II No one saw this 43rd Bomb Group B-17 get shot down, a mystery that wasn’t solved until 1946.

Tense Moments Over Finschhafen

At the end of March 1943, the Japanese had a base at Finschhafen, located on the eastern tip of the Huon Peninsula. The Allies had been monitoring Japanese military movement and thought the Japanese were planning a small landing. To prevent this, a variety of aircraft, including two 43rd Bomb Group B-17s, were sent out to harass the Japanese on the night of March 30th. Captain Frederick F. Wesche was flying the B-17 TAXPAYER’S PRIDE. He and the other pilot took for from Seven Mile in search of ships near the Finschhafen area.

Over the target area, both pilots dropped flares before setting up for their bombing runs. It looked like three destroyers were sitting near the coastline and Wesche picked one of them as his first target. Two bombs were dropped from low altitude, both missing the target. After three more runs, Wesche had one bomb left. A report of light antiaircraft fire didn’t deter the crew from making one final run, and TAXPAYER’S PRIDE was lined up once again. Right before the bomb was released, the B-17’s fuselage was hit by a 40mm shell.

Wesche crew

Captain Frederick F. Wesche (kneeling, left) was making his fifth bombing run on a destroyer off Finschhafen on March 30, 1943 when his B-17, #41-24448, was struck by a 40mm antiaircraft shell, which seriously damaged the plane and forced Wesche to later crash-land at Dobodura. The attack also injured the co-pilot and the tail gunner, who were sent to the hospital. This crew photo was taken in April 1943, after the two injured crewmen had recovered from the incident. The men pictured are, kneeling from left to right: Wesche, 1/Lt. Leslie W. Neumann, co-pilot; 2/Lt. Clement O. Kinkaid, navigator; 2/Lt. Joseph D. Howard, bombardier, and standing: Sgt. Joseph H. Mazaferro, engineer; Sgt. Paul N. Capen, gunner; Cpl. Donald J. Raher, radio operator; S/Sgt. Earl M. Rosengarton, gunner; and S/Sgt. Guy W. Clary, gunner. (Down Under)

Two engines were damaged and four vital systems, radio, electrical, oxygen and hydraulic, were knocked out. The #1 engine began to run away and the prop was feathered. Sparks from the damaged electrical system ignited the leaking hydraulic fluid, and the flames were also fed by the escaping oxygen. On top of all that, the 500-pound bomb that hadn’t been dropped was stuck in the bomb bay racks. First Lieutenant Francis G. Sickinger, the navigator, rushed to the bomb bay to help however he could. There, he found S/Sgt. Guy W. Clary, one of the waist gunners, using a fire extinguisher on the flames. He had been injured by shrapnel, but was still able to fight the fire, giving the bombardier the opportunity to shove the bomb out of the rack.

Sickinger helped Clary to the front of the plane, then the two of them had to put out a second fire that sparked. Once that was accomplished, the crew took stock of the situation. While TAXPAYER’S PRIDE was flying smoothly on three engines, the controls were not functioning. Co-pilot 1/Lt. Leslie W. Neumann had also been injured by shrapnel, and his injuries were also not life-threatening. Wesche headed for Dobodura.

Nearing Buna, the B-17 was greeted by Allied antiaircraft fire from the base at Oro Bay. After being attacked twice in four days, the men on the base were cautious about letting any uncommunicative aircraft fly overhead, let alone make an emergency landing. Since it was still dark, Wesche had to circle for two hours until sunrise, when he could see the runway and not risk getting shot at again during his landing. The crew manually lowered the landing gear, then discovered that the flaps were inoperable and the engines wouldn’t shut off. Once the B-17 was back on the ground, it rolled beyond the airstrip boundary and finally stopped in the grass. Both injured men were sent to the hospital and TAXPAYER’S PRIDE was sent to the 481st Service Squadron for repairs.


Read more about the 43rd Bomb Group’s B-17 era in Ken’s Men Against the Empire, Volume I.

Loss of PLUTO II

In the very early hours of June 30, 1943, a mix of heavy bombers from the 43rd, 90th and 380th Bomb Groups took off for a raid on Vunakanau Airdrome. The plan was to approach the target from 18,000 feet to avoid any Japanese night fighters, then make their runs between 9000 and 17,000 feet. For the most part, the stratification also provided extra protection from the antiaircraft gunners. Only the 403rd Squadron reported damage from antiaircraft fire, which hit the B-17 nicknamed STUD DUCK.

After the 63rd Squadron planes finished their bombing runs, a highly skilled J1N1 Irving night fighter pilot, SFPO Shigetoshi Kudo targeted B-17 #41-24543 PLUTO II. The B-17 was raked with gunfire, then Kudo watched it descend and crash into the mountains southeast of Cape Lambert, located west of Rabaul. Killed in the crash were Lt. Harold S. Barnett, pilot; 2/Lt. Sidney S. Bossuk, co-pilot; 2/Lt. Warren V. Seybert, navigator; 2/Lt. James G. Burke, bombardier; Sgt. James B. Candy, engineer; T/Sgt. Anthony H. Woillard, radio operator; Sgts. Robert A. Burtis and Donald W. Carlson, waist gunners; Sgt. Philip J. Lohnes, tail gunner; and Sgt. William A. MacKay, a radar operator from the RAAF.

B-17 Pluto II

B-17F #41-24543, PLUTO II, was the last B-17 to go down from the guns of an Irving night fighter over Rabaul. The bomber saw service initially with the 403rd Squadron before being transferred to the 53rd sometime in early February 1943, where it acquired its nose art. The solid stripe of paint at left was applied to cover up the bomber’s previous name, I DOOD IT. (Charles R. Woods Collection)

Back at Seven Mile, the men were worrying over the disappearance of the crew of PLUTO II. None of the American crews saw the B-17 get shot down. Captain Charles L. Anderson flew over the Owen Stanleys on a five hour search for the missing crew, and returned without any new information. It wasn’t until 1946 when the B-17’s wreckage was discovered at Madres Plantation on New Britain. Remains were subsequently recovered and investigators determined that the entire crew died in the crash.


Read more about the early part of the 43rd Bomb Group’s history in Ken’s Men Against the Empire, Vol. I.

A Collection of Photos

For every photo we publish in our books, there are dozens that don’t quite fit the subject matter or don’t have the necessary context information to be used. This is even true for the handful of color photos we publish in our color section. For this post, we figured it would be good to publish a few of those color photos that won’t make it into any of our books. Unfortunately, we don’t have specific information about the people or places depicted, although you might be able to recognize a few elements—for instance, that’s a B-17 coming in to land, probably at Port Moresby, New Guinea, in that last photo. The collection information has also been lost for all of these photos except for the last one, which comes from the C. Lloyd Anderson collection.


Sydney Harbour Bridge

Sydney Harbour Bridge (Unknown Collection)


Feeding a kangaroo

Feeding a kangaroo (Unknown Collection)


Relaxing at the beach

Relaxing at the beach (Unknown Collection)


Enjoying some watermelon

Enjoying some watermelon (Unknown Collection)


B-17 landing

B-17 landing (C. Lloyd Anderson Collection)

IHRA’s Top 7 Posts of 2019

This week, we’re listing our most popular posts published this year as determined by the number of views. Did your favorite post make the list?

Thank you for your continued support by subscribing, reading and sharing our work, and buying our books. If there’s anything you’d like to see more of, let us know in the comments. We’ll be back next year with more great content. And now, without further ado, our most popular posts published in 2019.


B-25 Impatient Virgin takes off 1. The Disappearance of Capt. Kizzire’s Crew Captain William L. Kizzire’s B-25 is shot down over Boram. The crew survived and disappeared before a rescue could be made.


2. Medium Bombardment Attack and Aviation A film to introduce the Pacific Theater to men being transferred from Europe.

Flight map: Aerodromes and Landing Grounds February 1943 3. Flight map: Aerodromes and Landing Grounds February 1943 Take a look at the flight distances between Port Moresby and important locations in February 1943.


408th Personnel at Nadzab 4. When Plans Go Awry: A Mission to Palau Captain John N. Barley’s B-24 is shot down after an encounter with several Japanese Zeros.


Death of an A-20 5. Shot Down at Kokas The story behind a fatal mission that took the lives of two men and produced one of the most dramatic photo series taken from a combat camera.


Taxpayer's Pride wreckage 6. Surviving in a Japanese POW Camp Shot down by Japanese fighter pilot SFPO Shigetoshi Kudo, this B-17 crewmember was turned over to the Japanese after he escaped certain death by jumping out of his plane over New Britain.


7. Ken’s Men, Vol. II Announcement We were so excited to share the news of this new release with you!

Repost: Knocking Out the 403rd

During the war, there were times when a squadron wound up out of commission for one reason or another. This story, first published in February 2014, covers an event that led to a squadron’s temporary removal from combat.


On January 17, 1943, four B-17s from the 43rd Bomb Group’s 403rd Squadron had taken off from Milne Bay for a mission to Rabaul. When the crews returned home later that day, they found smoke, a partially destroyed camp, and that the other three B-17s belonging to their squadron had been destroyed as well.

While the four crews were gone, the air raid sirens went off around midday. This was fairly common at Milne Bay and some of the personnel didn’t take it too seriously. For ten minutes men waited in nearby slit trenches. Nothing happened. The crew of FIRE BALL MAIL was getting ready to take the plane up before the alarm, scattered when it went off, then started going back to the plane. They soon heard what sounded like twin-engine bombers and looked up to see 23 Japanese bombers with 48 fighters flying over the base. The crew quickly ran for cover.

B-17 #540 Burns

The 403rd Squadron’s B-17F #41‑24540 smolders after it was hit during the raid at Milne Bay.

C. E. O’Connor, the co-pilot for that crew, later recalled the raid: “After the first bombs hit the rest followed in unison, working up to us like an avalanche and then pounding on past. This seemed like an eternity between the time the first bombs hit and the last—actually it must have been about 35 seconds … When those first bombs hit I started what might be my last act of contrition. I have never felt so close to death. At the same time realizing that I would never know what hit me.” Thankfully, no one at Milne Bay was killed or seriously injured that day.

Camp at Milne Bay after raid

What was left of the 403rd Squadron’s camp after the raid.

The damage from this raid put the 403rd Squadron out of commission. For several weeks, V Bomber Command had been monitoring the 403rd’s situation as it was continually weakening due to combat losses and disease. Approximately a third of the 403rd’s personnel were being treated for malaria at the time. With three more of their B-17s in ruins, the remainder of the Squadron was sent to Mareeba, Australia to regroup and reequip with B-24s.


Read this story in Ken’s Men Against the Empire, Volume I.